
Low Cost Ways to Keep Computing
Being able to use a computer has been such a positive aspect of my life with ALS that I want to share the tricks and tools I use to keep computing.
Step One: The Right Computer Desk
The first thought in computer access for the disabled is usually about finding hardware and software, but accessibility has to begin with even more basic problem solving; finding a desk that will allow you to use your computer!
Over the years I have been through any number of rigged up computer setups as I fought to
keep ahead of my ever-increasing weakness. Every setup turned out to be temporary—and
looked it! I finally had enough of crappy looking desks and set out to find a workable,
adaptable, computer work center that looked like furniture. The desk I came up with is made from
Sauder furniture and is the one I should have started out with because it is adaptable through
many stages of disability. I was already in a power wheelchair when I came up with the idea for
the desk so it was built to wheelchair height, but could be made at standard desk height and
elevated later using leftover, matching wood to maintain its good looks.
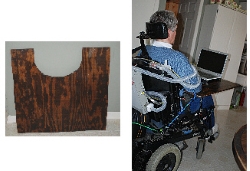
The first requirement of a desk is support for weak arms. It amazes me that very, very few
computer desks for wheelchair users have this feature! My arm support is cheap, easy to make,
uncomplicated, and roomy. I use a piece of plywood with a deep cutout so that it wraps around my
waist and extends far enough back to support my elbows. This tray slides out from under the
desktop and rests on my wheelchair armrests, providing support at just the right height for
shoulder comfort. At the time I designed this desk, I was still able to reach the tray and pull
it out, as well as use the keyboard. I can't do either of those things now, but the pull out
tray is easy for my caregivers. (I have to rotate the joystick for my wheelchair a bit to fit
under the tray.)
For diagrams and building information, go to Computer Desk
 I also have a portable tray made exactly like my desk tray. It is held onto my
chair with two short bungee cords (the blue straps) that hook through two small holes drilled
into the back edge of the tray and then down to hook on the wheelchair frame. It is a really
inexpensive, quick to set up, roomy solution for computing anywhere I go, but requires
assistance to set up even if you have arm strength.
I also have a portable tray made exactly like my desk tray. It is held onto my
chair with two short bungee cords (the blue straps) that hook through two small holes drilled
into the back edge of the tray and then down to hook on the wheelchair frame. It is a really
inexpensive, quick to set up, roomy solution for computing anywhere I go, but requires
assistance to set up even if you have arm strength.
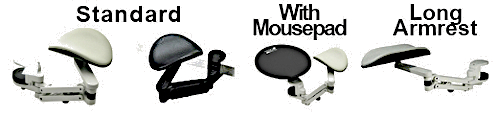
Arm supports recommended by Occupational Therapists are from medical/rehabilitation suppliers and are very expensive and industrial looking. They attach to the wheelchair which can be a real nuisance for transfers. The one advantage of this type is that they are available with springs or large rubber bands to help you raise your arms to feed yourself. This feature isn't needed for computer access though.
Commercial arm support devices available with the most affordable types found on web sites selling ergonomic devices for computer users. Besides being inexpensive, they are generally made to clamp onto the desk and have a finished look. Some combine the arm support with an attached mouse pad support.
Step Two: Tame the Mouse
Before making the switch from mouse to some type of eye gaze cursor controller, there are some things that can be done to prolong your mousing ability:
-
Reduce the need to click the mouse.
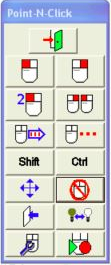 Point-N-Click can be set to automatically left click
whenever you place your cursor over a clickable item. That alone saves a gazillion clicks but
isn't the only option. You can quickly (and without clicking) switch back and forth to right
click, double click, click and drag, select multiple items from a list, and more. It doesn't
clutter your view of whatever is up on your monitor. It hides off to the side of the screen
and the control buttons are made visible by putting the cursor on the little edge that remains
on the screen. I use this freebie constantly!
Point-N-Click can be set to automatically left click
whenever you place your cursor over a clickable item. That alone saves a gazillion clicks but
isn't the only option. You can quickly (and without clicking) switch back and forth to right
click, double click, click and drag, select multiple items from a list, and more. It doesn't
clutter your view of whatever is up on your monitor. It hides off to the side of the screen
and the control buttons are made visible by putting the cursor on the little edge that remains
on the screen. I use this freebie constantly!
-
Change your mouse pad.
I use an oversized pad so that I don't can't push the mouse over the edge and have to struggle to get it back on the pad. XTracPads Ripper XL™ v2 is fantastic! It is 14 x 17 3/4 wide and has a friction free smooth cloth surface that maximizes the strength I have left. -
Free up your elbows.
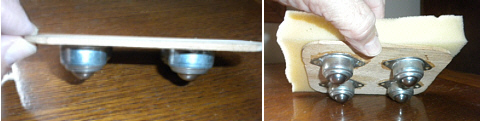
 For quite a while I used a Moving Men pad to allow smoother elbow turning,
pushing, and pulling the mouse. More recently I came up with an elbow roller that works even
better. Get 4 small rolling casters from Banana Robotics.
Cut about a 4X6 piece of thin wood or non-flexing plastic. (It could be smaller but I found
that the small size cut off circulation and made my arm go to sleep.) Attach the rollers with
small screws or glue. Add a pad of cushioning foam and your mouse will skate easily!
For quite a while I used a Moving Men pad to allow smoother elbow turning,
pushing, and pulling the mouse. More recently I came up with an elbow roller that works even
better. Get 4 small rolling casters from Banana Robotics.
Cut about a 4X6 piece of thin wood or non-flexing plastic. (It could be smaller but I found
that the small size cut off circulation and made my arm go to sleep.) Attach the rollers with
small screws or glue. Add a pad of cushioning foam and your mouse will skate easily!
-
Dress appropriately for your "office".
Avoid bulky clothing and rough fabrics that limit arm movement. -
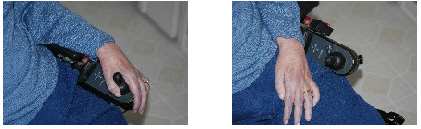
Get the right mouse and stick to it.
I use a simple optical mouse and prefer one without a scroll button which just gets in the way, but they are hard to find. A wireless mouse is just too heavy to push around. I have had to switch to my left hand, and need help to lift my fingers up onto the mouse. When the humidity is low or my hands are cold and stiff, a piece of tape helps hold my fingers on the mouse. Velcro tabs on the right and left buttons keep my fingers in place. -
Nail that tail.
I have found that the mouse cord hanging down will quickly pull the mouse sideways so the cord is tucked under the keyboard or taped to the desktop to hold it in place. - Reduce the mouse throw
Mouse throw refers to distance you have to be able to move the mouse to get it to the sides and corners of the monitor screen. A gamer's mouse may help. They have settings to reduce the mouse throw. The correct terminology is to reduce the CPI (count per inch) that controls how far the cursor moves in response to mouse movement. For me, a moderately priced SteelSeries Rival 300 gaming mouse makes the difference between using the computer or not! It solved the reaching problem entirely but made it a little more difficult to hit a specific spot on the screen on the first try. That is well worth the small aiming adjustments in exchange for the struggle to move the cursor long distances.
Step Three: Ditch the Keyboard
You don't need to be able to use a keyboard to use your computer, and you don't need to buy
any software! The software programs you need are free. Before you assume that purchased
programs would be better, consider the fact that this website is done using these freebies. I
also do photo editing and have a website for that, Free Photo Fix Magic
So what are these great programs?
-
Click-N-Type
The first program I rely on is a free onscreen keyboard called Click-N-Type. It puts a keyboard on the screen and as you
move the cursor over the keys, it types for you—or lets you control your computer with
any keyboard command (Control/Shift, F4, etc.). You never need to struggle with your keyboard
again!
Several great features make this freebie indispensable: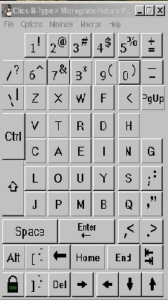
- You don't have to click the mouse for each letter. Just set it on auto click and it will
click as you pause the cursor over a key.
- You can set it with Macros that type frequently used words, phrases, or sentences with
just two clicks.
- It offers a standard Qwerty layout as well as an alphabetical one, and even allows you to
design your own. I have created custom layouts to speed up typing, code html, or use just the
number keys. The one shown here groups the alphabet in the center rather than in two long
lines, making it faster to find the desired letter. The most often used letters are centered,
making it even faster. Having a couple of the blank spaces lets you pause in your typing
without leaving the program.
- It has Word Prediction to speed up typing.
-
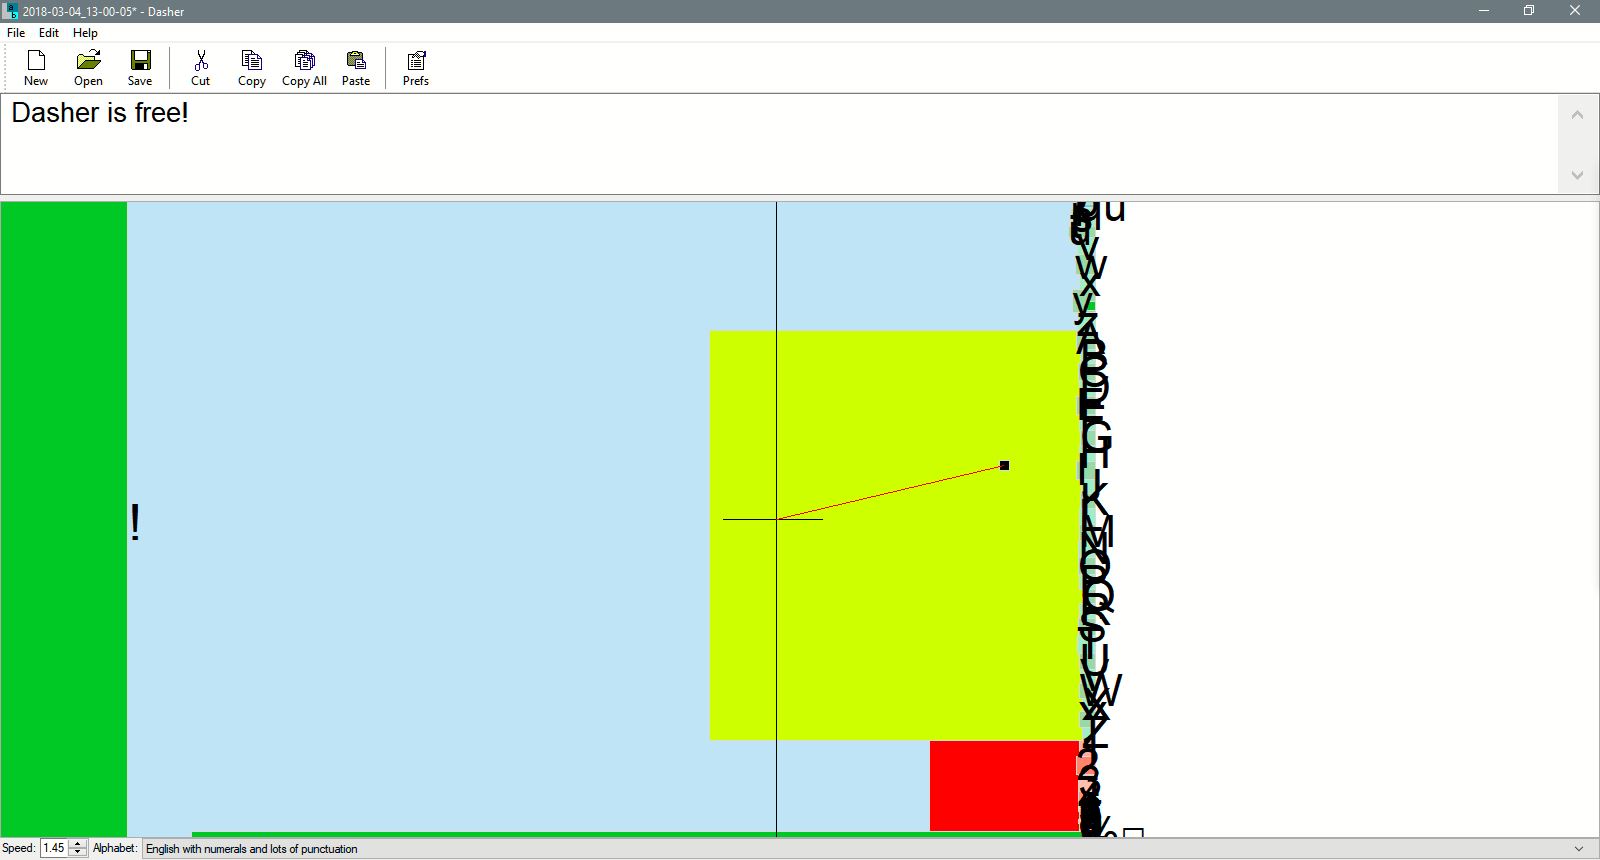
Dasher
The only drawback to using Click-N-Type is that is hard to type with any real speed as
it is essentially hunt and peck. When I want to compose an email or a bit of literary genius, I
Use Dasher, another freeware
program. Dasher is like playing a race car game—you just drive the cursor,
pointing it down the road to the next letter you want to type. With just a little practice you
can move at speeds nearing that of ordinary typing. The speed allows you to work at composing,
not just plunking out letters! I find that setting the View/Orientation at Bottom to Top works
best.
Step Four: Move the Monitor
Even the slightest amount of neck weakness can make using the computer an effort. Neck
muscles tire quickly if not supported, but leaning back to use a headrest changes the angle of
view, causing eye strain. I thought I needed new glasses when I couldn't read anything but the
largest type. Then I discovered that all I needed was a booster seat for the monitor! By raising
my desktop monitor up about 5 inches, I can rest my head and still see the screen at the right
angle. I expect that at some point I will have to find a way to compensate for a more reclined
position by both raising the monitor and tilting it forward. But for now, my monitor is on a
sturdy plastic tool case awaiting the day when someone gets around to building a nice shelf for
it.
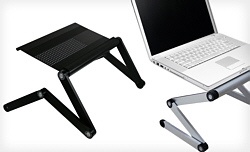 My laptop required a much higher boost to bring it up to a comfortable eye level
and a collapsible, completely adjustable for both height and angle monitor stand has been
terrific. Easy to adjust, more and taller heights possible, stable without clamps or bolts, and
the laptop doesn't need to be attached to it. Several brands are available.
My laptop required a much higher boost to bring it up to a comfortable eye level
and a collapsible, completely adjustable for both height and angle monitor stand has been
terrific. Easy to adjust, more and taller heights possible, stable without clamps or bolts, and
the laptop doesn't need to be attached to it. Several brands are available.
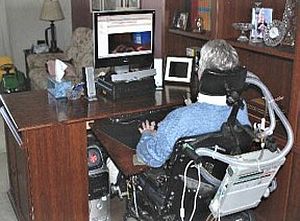
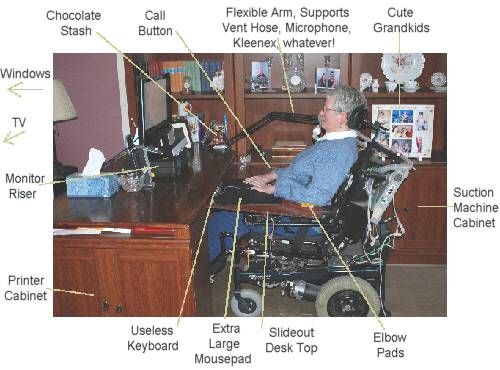
The End Result...
Me, happily at my computer, surrounded by my adaptive equipment!
Back To Top

The first program I rely on is a free onscreen keyboard called Click-N-Type. It puts a keyboard on the screen and as you move the cursor over the keys, it types for you—or lets you control your computer with any keyboard command (Control/Shift, F4, etc.). You never need to struggle with your keyboard again!
Several great features make this freebie indispensable:
- You don't have to click the mouse for each letter. Just set it on auto click and it will click as you pause the cursor over a key.
- You can set it with Macros that type frequently used words, phrases, or sentences with just two clicks.
- It offers a standard Qwerty layout as well as an alphabetical one, and even allows you to design your own. I have created custom layouts to speed up typing, code html, or use just the number keys. The one shown here groups the alphabet in the center rather than in two long lines, making it faster to find the desired letter. The most often used letters are centered, making it even faster. Having a couple of the blank spaces lets you pause in your typing without leaving the program.
- It has Word Prediction to speed up typing.
The only drawback to using Click-N-Type is that is hard to type with any real speed as it is essentially hunt and peck. When I want to compose an email or a bit of literary genius, I Use Dasher, another freeware program. Dasher is like playing a race car game—you just drive the cursor, pointing it down the road to the next letter you want to type. With just a little practice you can move at speeds nearing that of ordinary typing. The speed allows you to work at composing, not just plunking out letters! I find that setting the View/Orientation at Bottom to Top works best.
My laptop required a much higher boost to bring it up to a comfortable eye level
and a collapsible, completely adjustable for both height and angle monitor stand has been
terrific. Easy to adjust, more and taller heights possible, stable without clamps or bolts, and
the laptop doesn't need to be attached to it. Several brands are available.