The first thought in computer access for the disabled is usually about
finding hardware and software, but accessibility has to begin with even more
basic problem solving: Finding a desk that will allow you to use your
computer!
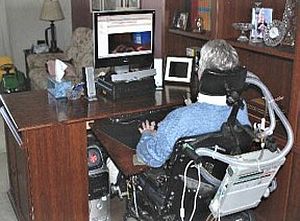
My computer has been at the center of my life ever since ALS began
affecting my mobility. I practically live at my desk, and my computer center
has undergone several changes over the years as my strength deteriorated.
None of the available computer desks seemed to work—too low to get my
wheelchair under, too small a tray to rest my arms on, etc. After adding
blocks to raise it, and trying various trays for keyboard and mouse,
bringing in stray pieces of furniture to put peripherals on, I finally had a
computer center that worked. But it looked just like the make-do
conglomeration of parts that it was.
I finally had enough of crappy looking "desks" and set out to find a
workable, adaptable, computer work center that looked like furniture. After
a lot of measuring, planning, and shopping, I decided to use Sauder
assemble-it-yourself furniture and a little bit of ingenuity to create the
computer center I wanted. Convincing my husband that my ideas would work
(especially the part about sawing a bookshelf in half!) took a bit, but he
did it and I finally have a set-up that I consider ideal! Not only is it
functional for me, but it is also attractive. It is the desk I should have
started out with because it is adaptable through many stages of disability.
It has been with me through ever increasing arm, hand, trunk, and neck
weakness, and onto a ventilator. It even followed me when the family room
became my bedroom and the dining room became my space!
Then ..... and Now
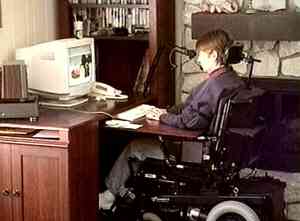
The first requirement of a desk is support for weak arms. It AMAZES me
that very, very few computer desks for wheelchair users have this feature!
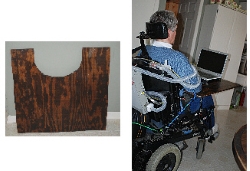
My arm support is cheap, easy to make, completely uncomplicated, and part of
my desk itself. I use a piece of plywood with a deep cutout so that it wraps
around my waist and extends far enough back to support my elbows. This tray
slides out from under the desk top and rests on my wheelchair armrests,
providing support at just the right height for shoulder comfort. I have to
rotate my wheelchair joystick to fit underneath, and then slide the tray out
over me. At the time I designed this desk, I was still able to reach the
tray and pull it out, as well as use the keyboard. I can't do either of
those things now, but the pull out tray is easy for my caregivers. The wrap
around me tray made it possible for me to use the keyboard much longer, and
the mouse even now with minimal wrist strength.
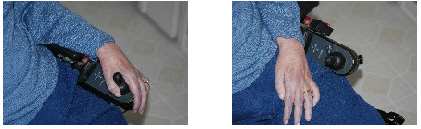
I can also use the tray as a portable tray for my wheelchair. It is held
onto my chair with two short bungee cords (the blue straps) that hook
through two small holes drilled into the back edge of the tray and then down
to hook on the wheelchair frame. It is a really inexpensive, quick to set
up, roomy solution for computing anywhere I go, but requires assistance to
set up even if you have arm strength.
Parts
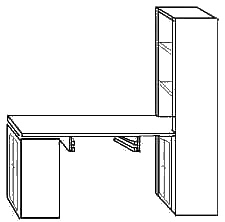
Two Bookshelves (One will be cut in half for one end of the desk.)
Any 30" wide bookshelf will work for the bookshelf end of the desk. I chose
one with doors on the bottom to hide clutter. These are generally 16" deep.
If the overall length of the desk needs to be minimized, look for a plain
bookshelf about 6 or8" deep.
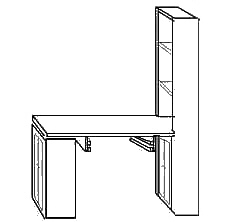
I could not find a matching cabinet the right dimensions for the printer
cabinet end. All were either too low, or several inches wider than the desk
top. It was just as economical to buy a second bookshelf and cut it off at
the right height. Again, if the overall length of the desk needs to be
minimized, a shallow bookshelf will work to support the desk top, but
probably won't be deep enough to serve as a printer cabinet.
Desk top: 30"x70" sheet of 3/4" plywood.
The length can be adjusted to fit the available space but
must remain long enough to accommodate the oversized keyboard tray and its
brackets in the kneehole between the bookshelf and cabinet. Selecting birch
or oak plywood will make it easier to stain the desk top to match the
bookshelves. The desk top is notched on one end to fit inside the
bookshelf.
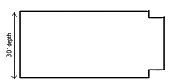
Keyboard tray 30"x32" sheet of 1/2" plywood.
The keyboard tray was cut to allow it to wrap around me. Use a large piece
of cardboard to make a pattern. Make sure that the "armrest" section is
long enough to completely support your elbows, not just your forearm.
The depth of the tray must be 30 inches: any less and you won't have room
to work. Any more and it won't slide all the way under the desk which it
has to be able to do if you use a power chair: You need to pull into your
parking space, and then pull the tray out over your armrests. You won't
have enough toggle clearance to drive under an extended tray. I find I have
to park, turn my chair control joystick a bit sideways so the joystick is
lower than the armrest, then pull the tray out.
The width of the tray should be as wide as space allows. It will be your
working surface and the more room you have for mouse, keyboard, papers,
call button, phone, a drink, etc., the better.
Assembly
If necessary, assemble the tall bookshelf according to the directions.
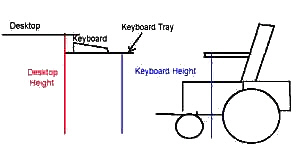
Measure the height needed for the desk top. This takes a little
calculating. Measure the distance from the floor to the top of the
wheelchair armrests. This is the height needed for the pull-out tray so
that it rests on the armrests. Add 5 more inches for the depth of the tray
and the space between the tray and the desk top. It needs to be high enough
for the keyboard to fit easily under the desk when the tray is pushed
in.
If it is not assembled, lay out the pieces for the short bookshelf. Cut the sides and back at
the height determined for the desk top, and assemble the cabinet. If it is assembled, cut to the right height.
Cut the desk top and tray from the sheet of 3/4 inch plywood. The
length of the desk top can be adjusted to fit the available space but needs
to be long enough to allow for adequate kneehole space.
Before going further, set the pieces up to make sure they fit together
and in the available space.
Adjust the height of a shelf on the tall bookshelf to the desk height.
If shelf is not an adjustable one, just add a piece of wood so the
underside of the notched end of the desktop so it is level.
Mark the underside of the desk top where the slide-out tray is to go.
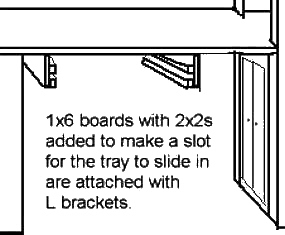
If you can't find metal drawer slides long enough for the deep tray,
(we couldn't) make wood runners.
To make the tray runners mount 1x6 boards to the underside of the
desk top with L brackets.
Screw 1x2's at right angles to that to make the edges the tray will
sit on.
To keep the tray level, add a strip of 1x1 above the 1x2's to form a
slot for the tray. Space them about 1 inch above the 1x2's to give the
3/4" tray plenty of room to slide without binding yet keep the tray
fairly level as it is pulled out. You can wax the sliding surfaces with
an old candle to make the tray slide even more easily.
Finally, we added the quarter round to the edges of the desk top and
stained the desk top and tray to match the bookshelf.

 The length can be adjusted to fit the available space but
must remain long enough to accommodate the oversized keyboard tray and its
brackets in the kneehole between the bookshelf and cabinet. Selecting birch
or oak plywood will make it easier to stain the desk top to match the
bookshelves. The desk top is notched on one end to fit inside the
bookshelf.
The length can be adjusted to fit the available space but
must remain long enough to accommodate the oversized keyboard tray and its
brackets in the kneehole between the bookshelf and cabinet. Selecting birch
or oak plywood will make it easier to stain the desk top to match the
bookshelves. The desk top is notched on one end to fit inside the
bookshelf.
 Measure the distance from the floor to the top of the
wheelchair armrests. This is the height needed for the pull-out tray so
that it rests on the armrests. Add 5 more inches for the depth of the tray
and the space between the tray and the desk top. It needs to be high enough
for the keyboard to fit easily under the desk when the tray is pushed
in.
Measure the distance from the floor to the top of the
wheelchair armrests. This is the height needed for the pull-out tray so
that it rests on the armrests. Add 5 more inches for the depth of the tray
and the space between the tray and the desk top. It needs to be high enough
for the keyboard to fit easily under the desk when the tray is pushed
in.